Thursday 20 October 2016

New blog location. This will be my last Blogger post

After a good run for a couple of years, I'd now time that I move on. I was getting frustrated with Blogger as a platform and just wasn't inspired to write at all. I've now remedied that by setting myself up with my own web site and running WordPress.


My new blog and site can now be found at https://darkartsastro.ca.


Thank you to everyone who's followed me. I invite you to come join me over at my site!

Thursday 21 April 2016

Getting Started in Astrophotography

One of the questions I get asked the most often is how one gets started in astrophotography. More specifically, what kind of equipment is required in order to take images like I do. In this article, I'll try to clarify that. Note that this won't be covering technique or procedures in any way, but rather just what you need to get into it.

The first thing to mention is that there are 3 types of astrophotography:

  • widefield / landscape;
  • solar system; and
  • deep sky.

Each of these types will require vastly different equipment and techniques, as well as software and technique for post processing. I'll be covering each of these 3 types and what is required to get the best results.

Widefield / Landscape

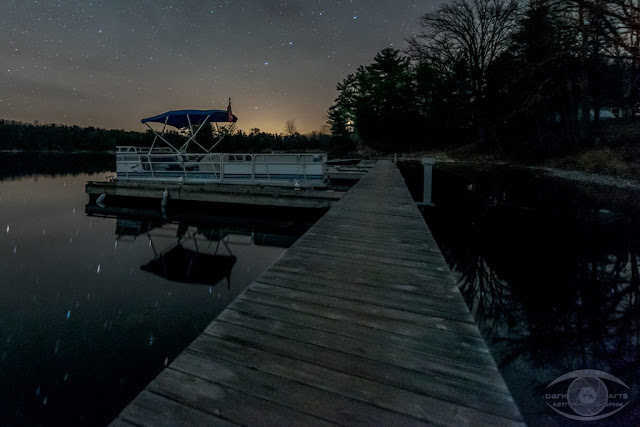
This type of astrophotography is generally the most simple concept of the three. You can do this with just a camera and tripod. You basically frame a terrestrial target with the starry sky as a backdrop and take a picture. Or perhaps you want to point your camera upwards and get just a star field shot and not have a terrestrial target in view. Using this technique is how you shoot the Milky Way or Aurora Borealis.
Widefield image shot with a DSLR on a tripod
While it's possible to use some point and shoot type cameras with manual mode to do this, you'll really get the best results using a DSLR or mirrorless camera that can accept wide angle lenses. Even a basic entry-level DSLR with the stock 18-55 kit lenses will be able to get you some really good shots. Naturally, a more capable camera and better lenses paired with good technique will always get you better results. If you're interested in learning more about this type of astrophotography, you can read my How To Shoot The Milky Way And Night Sky With A DSLR Camera article.

Solar System

This type of photography is exactly what it sounds like. You're taking pictures of objects in the solar system. This will include the moon, the sun (ONLY with the proper protective filters!!!), and planets. It can be a very rewarding pursuit in its own right. But it's also where your equipment requirements increase significantly.
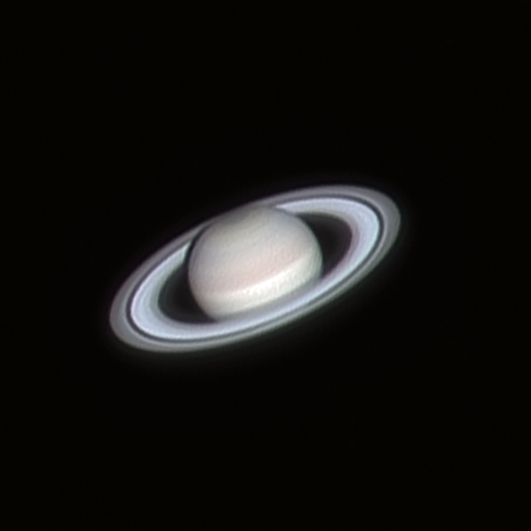
Saturn shot through an 8" Meade LX90 with 3x barlow using a ZWO ASI120MC-S colour camera

In order to effectively image solar system objects, you'll need:

  • telescope; 
  • sturdy mount (preferably motorized with tracking); 
  • solar filters if imaging the sun;
  • planetary imaging camera; and
  • a computer.

Unlike other types of astrophotography, you don't actually take pictures when shooting solar system objects. While you can take images of the moon with a DSLR, typically, a video camera is used to shoot video of the object. In post-processing, software will deconstruct your video into individual frames that will then be stacked to enhance detail and give you your final image. For more information on solar system image stacking, you can refer to my "Lunar image stacking. Is it worth it?" article.

Telescope


For this type of imaging, a telescope is required. The ideal telescopes for solar system imaging will have a long focal ratio of f/10 or greater. The higher the f/ value, the more magnification you get. While normally magnification power is the least important aspect of a telescope, all but the moon and sun will be nothing but dots of light in the sky, you need to have a telescope with a decent aperture and good magnification in order to make these celestial bodies large enough to image.

Catadioptric designs such as Maksutov-Cassegrain are prized planetary and lunar imaging scopes due to their typical f/12 - f/15 focal ratios. Schmidt-Cassegrain models are also excellent solar system scopes due to their relatively large apertures and f/10 ratios. Other scopes such as refractors and reflectors can also be used, but most common ones have focal ratios of f/5 to f/7. However, there are many great refractors and reflectors that have f/9 and higher ratios that can also do the trick. Basically, any type of scope can be used for this, but some will perform better than others.

Mount

As with any photographic pursuit, what you mount your camera and lens on needs to be sturdy. Whether you're using a simple camera on a tripod or have a huge array of telescopes on a large mount, having a sturdy mount whose weight rating exceeds the payload you're mounting on it is essential to getting good results. Ideally, your mount should hold at least double the weight of the telescopes, cameras and other gear you'll be mounting to it for maximum stability. This will ensure that everything is stable and vibration free.

Ideally, you want a motorized mount that's capable of tracking objects in the sky. With lower magnification, you can get away with a manual mount. But once you get into higher powers typically used for solar system imaging, objects will very quickly drift out of your field of view requiring you to stop imaging, reposition the scope and start again. While this can be done, it's not much fun. A tracking mount saves this hassle.

There are 2 types of mounts that you can get; altitude-azimuth (alt-az) and equatorial (EQ). Alt-az are simpler and cheaper. They track the sky using simple up / down (altitude) and side to side (azimuth) motions. They'll be able to easily track the moon, sun or planets. They're the easiest types of mounts to set up, align and use. The down side is that while they track the object, they do it with the Earth as a point of reference, so over time, you will see the object you're tracking rotate in your field of view. This is called field rotation. A series of images of a planet with distinguishable features such as Jupiter or Saturn will show this rotation over time. But for planetary imaging, this effect is negligible.

EQ mounts are more complex to set up and and align, and tend to be bigger and heavier since they require a heavy counterweight to balance out your load. But EQ mounts have some advantages over alt-az mounts. The central axis of rotation of the mount is aligned to the celestial pole which is just slightly off from Polaris, the north star. Once correctly aligned, an EQ mount only requires 1 of its axes (right ascension RA) to move to track the sky. And it does track the whole sky, not just the object, so field rotation is completely eliminted. Good EQ mounts also hold a far heavier payload than alt-az mounts, making them the preferred choice for both solar system and deep sky astrophotography.

Solar Filter

As the name implies, these are used when imaging the sun. The simplest ones are simple reflective mylar films that are mounted on the front of the telescope and produce white light images. They're quite inexpensive and easy to use. More expensive glass filters are available that will show the sun in various colours. For more advanced imaging applications, narrow band filters like Hydrogen Alpha will allow you to image convective currents on the surface of the sun as well as capture solar prominences. These latter filters tend to be extremely expensive.

Camera

The dedicated cameras used for this type of imaging are high frame rate web cams. There are many companies that make said cameras and they're typically available for a couple of hundred dollars and up. It's also possible to modify a normal webcam for planetary imaging, although most will be limited to frame rates of 30 fps. However, considering how cheap webcams are, these are a great option for someone on a budget just starting out. There are many video tutorials available on YouTube that will guide you through removing the lenses on webcams to make them suitable for astrophotography.

Computer

In order to capture the images, you'll need to have a computer available. In most cases, people will use laptops for this due to portability and power. You don't need anything ridiculously powerful to do this. If you have an old laptop, it will likely do just fine. Despite all my equipment, I use a 12 year old netbook as my field computer equipped with an SSD and it works great for this purpose. It's a little slow to boot and load my software, but once everything is running, it performs like a champ.

To Mac users out there, you'll find very little astronomy software available. Pretty much all the good software is Windows only. So if you're running a Mac, running Bootcamp and Windows is highly recommended.

Deep Sky

This is potentially the most difficult and gear-intensive type of astrophotography. Deep sky objects include nebulae, galaxies and star clusters. It involves taking a series of long exposure images of your target that you later stack in software and then post process. In order to get good results, you need the proper equipment and great technique.


Basic Imaging With A Tracker

First, I'll cover a basic setup that will get you very pleasing images using a DSLR or mirrorless camera with a tracking mount. This requires very little in terms of equipment and is ideal for someone who is just getting into astrophotography but doesn't want to invest into a lot of expensive equipment to start out. It will, however, mean that you need to be able to find objects in the sky that you can't see with the naked eye.

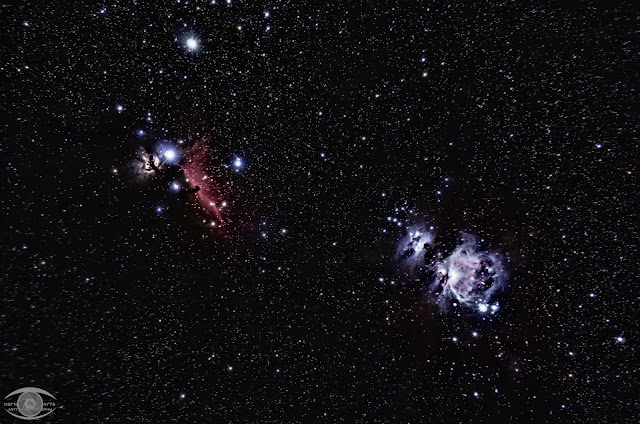
All you need is your camera, a telephoto lens, a remote shutter release, a tracking mount, and a sturdy tripod and you're golden. This is probably the simplest way of getting into deep sky imaging. This type of deep sky imaging will give you wide fields of view capturing your target as well as a lot of the surrounding space. This is ideal for shooting large targets such as the Andromeda Galaxy, constellations, or large nebulae such as the Orion Nebula. While this won't get you up close and personal with other distant galaxies, planetary nebular and globular clusters, it will still give you some amazing images. Some of my best images have been shot this way using a 55-300mm lens at various focal lengths. You can also use wider angle lenses to track parts of the Milky Way, which will produce incredibly detailed images that are impossible to get with a camera on a tripod.

Wide angle image shot with at 150mm on an iOptron SkyTracker

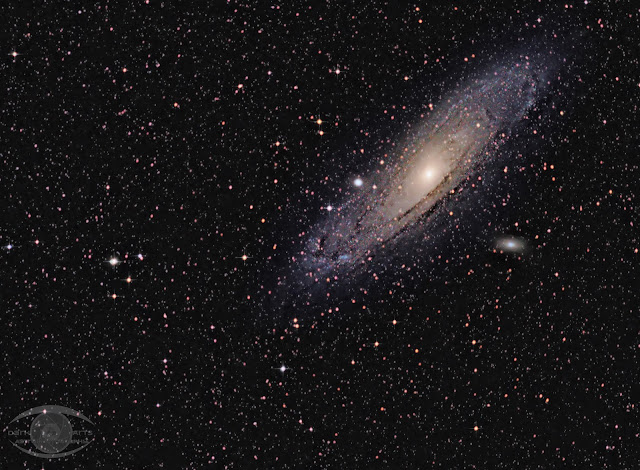
The Andromeda Galaxy shot @ 300mm using the iOptron SkyTracker

Camera

There's not much to say here. You need a regular DSLR or mirrorless camera. It's really that simple. Even an entry level DSLR will be suitable for this. As I always say, a better quality camera used can potentially produce better results, but with good technique, a solid mount and good optics, you can get incredible images out of any modern DSLR at any price range. As always, if you're purchasing a new camera, I would recommend going for more of an intermediate level camera, because you can quickly outgrow the capabilities of an entry-level camera.

Lens

For this type of photography, almost any lens can be used, although you need to match the lens to your target. For example, imaging the Andromeda Galaxy or Orion Nebula will be best at 200-300mm focal lengths to capture the finer details in these objects. An image of the entire Orion constellation and the Orion Molecular Cloud Complex will require a wider angle lens.

The point is, you can get away with using pretty much any lenses you already own for this. Like anything else in photography, good quality lenses will produce sharper images. Your lens will have more of an outcome of your final image than the camera will. If you can splurge for a more expensive ED lenses, then by all means do so. But don't let having "kit lenses" discourage you. Their optics will be fine for the job.

Tripod

This is one item that is often overlooked. Your tripod is the foundation on which everything else rests. It really doesn't matter if you have a $10 000 camera and lens combination. If your tripod is flimsy and sways in the slightest breeze, you won't be able to get a good end result, particularly in this type of photography where you'll be shooting exposures of 30 seconds to 3 minutes. You tripod's weight rating needs to exceed the total weight of your camera, your heaviest lens, and your tracker.

Tracker

Once upon a time, the only way to take deep sky images required a bulky equatorial mount. These days, there are several options available for lightweight, portable sky trackers. Popular options are available from iOptron, Vixen and Sky-Watcher. These units aren't cheap, but cost a lot less than full size, motorized equatorial mounts. They all work extremely well for their intended purpose and I honestly don't know of any "bad" ones on the market currently. Let your wallet be your guide here.

Deep Sky Imaging With A Telescope

Finally, we get to the one that everyone THINKS they want to do - imaging at prime focus with a telescope. This is easily the most complicated and most expensive type of imaging you can do. It required a lot of equipment (usually expensive), has a steep learning curve, and will cause some frustrations along the way. That said, to me this is also the most rewarding type of imaging and my favourite.

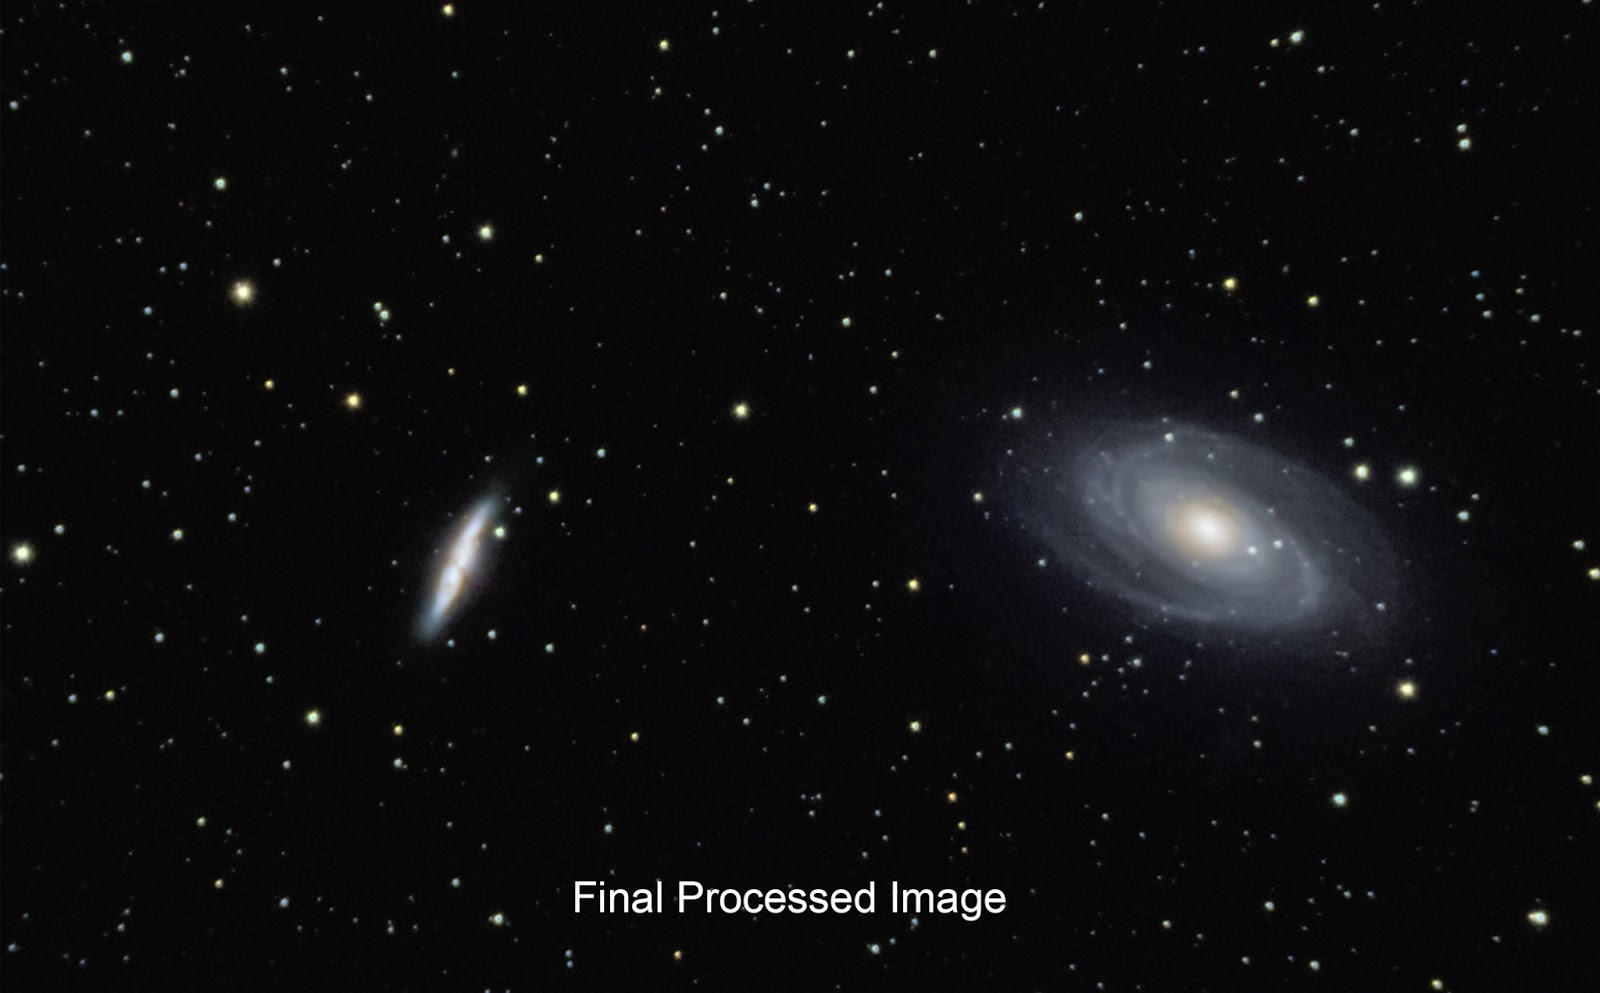
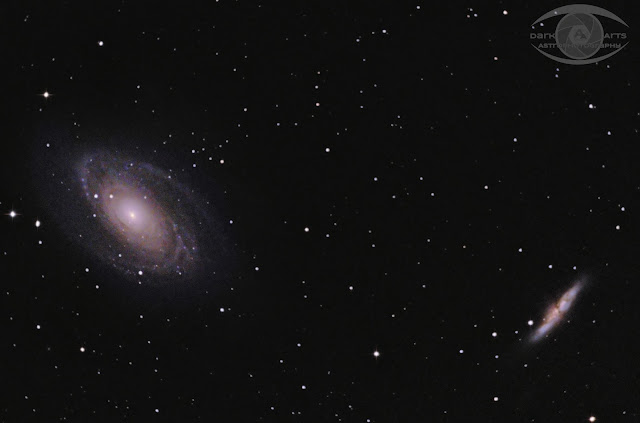
M81 and M82 shot through an 8" Meade LX90 and a 0.63x focal reducer on an EQ mount with autoguiding.
The most basic equipment requirements are similar to solar system imaging, although there are some extras required. Note that in this list, I'm not including specialized equipment for advanced narrowband imaging. I'm only covering the basic requirements.
  • imaging telescope; 
  • focal reducer, field flattener, coma corrector (depending on the scope);
  • sturdy EQ mount (motorized and preferably with go-to computer); 
  • DSLR, mirrorless or dedicated CCD imaging camera;
  • guide scope and camera;
  • dew control (if you're in a humid climate);
  • power supply
  • a computer.

Imaging Telescope

This is your main telescope that you will be capturing your images though. There are many options available for deep sky imaging, but ideally, you'll be looking for a scope with a focal ratio of f/7 or less. High power is not required. Most deep sky objects are relatively small in the night sky, but unlike planets that appear as a dot of light, deep sky objects had a much greater apparent angular width. It's more important to have a fast scope with a low focal ratio than power. 

Fast Newtonian reflectors are good deep sky imaging scopes. They have a wide aperture and will produce great deep sky images. However, most will require a coma corrector / field flattener to produce sharp, pinpoint focused stars across the field of view.

Catadioptric designs are excellent scopes for this type of imaging. They offer a wide aperture in a relatively compact size and weight and offer excellent views of deep sky objects. Schmidt-Cassegrain scopes are kind of the "jack of all trades" scope. Depending on the model your scope, attaching a focal reducer will reduce its focal ratio to f/6.3 to f/7. Some older, larger SCTs have a native ratio of f/6,3. Adding a reducer to those will lower you down to f/4, making it ideal for imaging.
Apochromatic refractors are a great choice for deep sky imaging, although usually come at a fairly hefty price tag for larger apertures or higher quality models. They will produce incredibly high contrast, sharp images of the night sky and are prized by astrophotographers for their ability to deliver amazing colour. Coma correctors are also usually required in models with ratios of f/6 or faster to maintain pinpoint stars across the field of view.

Mount

One again, I must stress that a sturdy mount is ESSENTIAL for long exposure deep sky imaging. Ideally, you want your mounts payload capacity to be at 1.5-2x the total payload you intend to mount on it.  An EQ mount is a necessity for this type of imaging. Alt-az mounts can't handle exposures longer than 20-30 seconds due to field rotation. 

Camera

There are really 3 options here; a DSLR, a mirrorless, or a dedicated CCD astro-camera. To use a DSLR or mirrorless, you'll need the proper T-mount and ring compatible with your camera model, and you attach the camera to the telescope in place of an eyepiece. The telescope then becomes a large telephoto lens for your camera. You can then control the camera either with a remote shutter control (either manual or programmable) or via a computer to capture your images.

Dedicated CCD imagers are also readily available, but tend to be quite costly. There are sub-$1000 models available, but they're generally not recommended as they will produce lower quality images compared to a DSLR. If this is what you want to do, then a colour model is recommended for beginners. For more advanced users, a monochrome version + filter wheel and associated filters are the ultimate setup. But this also tends to be very expensive, and the amount of work required for both image capture and post-processing increases tremendously.

Guide Scope and Camera

You may have heard the term "auto-guiding". What this means is that you have a second scope and camera attached to your mount along with your imaging scope with a separate camera to guide your main imaging scope. The second camera is a webcam style camera like a solar system imager. In fact, most dedicated solar system imagers come equipped with an ST-4 guide port and double as guide cameras. 

Even though your mount may track the sky, small imperfections in gears will cause small deviations over time. Without correction, this will result in your stars looking like small hyphens or be oblong-shaped instead of round pinpoints.

Your guide camera locks onto a star that's in your guide scope's field of view and monitor's its position. As the mount drifts over time, the camera will then send corrective signals back to the mount to compensate and try to keep the guide star at the exact same position on its sensor.

It's possible to shoot shorter exposures of deep sky objects without guiding, but only when using an auto-guider will you be able to track the sky accurately for more than 1-2 minutes, depending on the focal ratio of the scope you're using. If you're serious about getting a lot of detail in your deep sky images, this is an essential piece of equipment.

Dew Control

If you're in a humid climate and using a scope with a lens at the front, you will eventually collect dew on your lens. This will ruin an imaging session in a hurry. Electric dew control solutions are available. If you can't immediately afford dew heaters, refer to my article Dew Control, Ghetto Style for an alternate, cheap solution. It may look silly, but will keep your optics dew-free.


Power Supply

This is an essential part of using your equipment. If you're practicing your craft in your back yard or where power is available, then this isn't an issue. And extension cord and power bar will keep you running all night. But if you need to travel, portable power is a necessity. You need to make sure that whatever you use can power your equipment for the duration of your session. Keep in mind that laptops and dew heaters will tend to drain any battery very quickly.

Computer

Depending on your setup, you may or may not need this. If you have a standalone auto-guider and are using a remote of some sort for you camera, you can do without. Otherwise, you'll need a Windows-based computer. Like for solar system imaging, you don't need anything overpowered. I also use my same old netbook for this task.

Conclusion

Much of this may sound complicated and expensive. And in many cases, it is. If you get into astrophotography in any serious way, you will for out a lot of money for different equipment. But don't let the lack of equipment stop you! There are inexpensive ways to have fun taking images of the night sky with a telescope. Inexpensive mounts will allow you to attach a smartphone to an eyepiece of a telescope and let you take pictures that way. They may not be publication or print-quality images, but they will definitely be suitable for your Instagram or Facebook accounts. It's more about making the best of what you have than having the best of everything.

So go out, have fun, and take some pics of the night sky.

Have questions or comments? Leave them below or come on over to my Facebook page at http://fb.darkartsastro.ca and post a comment.

Until next time, clear skies and keep your eyes and lenses pointed skywards.

Friday 1 April 2016

The Effects Of Deep Space Image Stacking

In my last article, I discussed lunar image stacking in detail. Since then, I've received a few questions on deep sky stacking and what images should look like at the 3 major stages of processing: raw, stacked, and final product. So I'm going to briefly show what the results of stacking are in this article.

The Benefits of Stacking

Stacking of deep sky images has several benefits for the modern astrophotographer. The most obvious is to be able to combine many exposures to give the same effect of long exposures of the days of film. In this digital age, stacking is an essential part of deep sky imagine. Long gone are the days and associated challenges of shooting single 30+ minute exposures of deep sky objects on film.

Integration Time

The biggest and most easily understood benefit is that you can take a bunch of shorter exposures, stack them, and get the combined result of a long exposure that equals the lengths of the shorter exposures combined. At least this is the way it works in theory. There are limitations, but by and large, 15 x 2 minute exposures will give you a result comparable to a single 30 minute exposure, either digitally, or on film.

Noise Reduction

Digital noise is a reality of long exposure digital photography. As digital camera technology advances, sensors are getting better and produce lower noise. But noise is still an inevitable part of photography, particularly long exposure night photography. 

Stacking multiple exposures increases the signal to noise ratio of the image. This means that details that are present in every single frame (stars and deep sky objects) will be amplified, whereas random background noise will be removed. Even things like meteors, satellites, or planes flying through your field of view (which would have ruined a long exposure on film) will be automatically removed via the stacking process. If detail isn't in every single frame in your stack, it won't be visible.

Adding calibration frames (dark, bias and flat frames) will further increase the quality of your image. Dark frames will remove the noise signature of your camera's sensor from your final image. Flat frames will remove any vignetting and dust motes you may have on your sensor. Bias frames will eliminate traces of hot and cold pixels on your sensor. The details of calibration frames is beyond the scope of this article, but is very worthwile looking into. At the very least, you should be shooting dark frames whenever you shoot deep sky objects, and at least 50-75% of the number of light (image) frames that you're shooting for best result. 

Accurate Tracking and Error Tolerance

This is probably less obvious, but stacking makes tracking more accurate. It's far easier for any mount to track over short durations versus long ones. In the days before auto-guiding, astrophotographers had to diligently manually correct for tracking errors on their mounts. The smallest of tracking errors would ruin a long exposure. 

Most quality motorized mounts, even the more inexpensive varieties, can easily track an object accurately for a minute or two, depending on the focal length of the telescope or lens. However, over longer periods of time, there will be some drift which will cause stars to trail. As a result, stacking many short exposures with pinpoint stars will yield a far better end result than using the equal time of longer exposures.

With modern mounts and imaging techniques using more sophisticated setups that include auto-guiders. this isn't necessarily an issue. With accurate polar alignment, a guide scope and camera, you can literally track for hours with near 100% accuracy. The auto-guiding system will send corrective instructions to your telescope compensating for any drift, giving you sharp, pinpoint images. 

Now we'll take a look at how images look at the various stages of the stacking and post-processing processes.

The Results

For this example, I'm going to use an image of M81 and M82 that I recently shot. For this image, I shot 1 hour of 30 two minute exposures plus 20 dark frames for noise reduction. Unfortunately, due to user error with this new telescope (second time out with it), I lost a whole hour's worth of exposure time. I had shot 2 hours' worth of exposures, but when checking my results after 1 hour, I inadvertently messed up my focus as I had forgotten to lock down the focuser, Lesson learned and mental note made for next time!

The images were shot using my Nikon D5100 attached to my new Explore Scientific ED80 apochromatic refractor. Tracking was done using my Celestron Advanced VX mount without guiding.

The images were shot at 16 megapixels and had a much wider field of view. These samples images are heavily cropped to highlight the details in the galaxies and to show the levels of background noise. The full, final image is shown at the end of this article and you can see how much better it looks at its proper resolution.

This first image shows what a raw image from the camera looks like. No processing was done on it other than the crop and saving to JPEG. As you can see, detail in the galaxies is visible, but rather faint. And there's a lot of noise and pixellation washing out the details. Anyone familiar with deep sky objects will immediately recognize the objects in this image, but the results are rather underwhelming.


This second image shows the result of 30 stacked exposures + 20 dark frames using DeepSkyStacker. The background noise that plagued the single RAW frame is almost fully eliminated and the background is nice and smooth. The effects of light pollution are amplified over the RAW but the background is nice and uniform and almost completely noise-free. The image is still fairly low contrast, so the finest detail is hidden, but finer structural detail is visible in the galaxies. The gradients aren't very smooth, but that's a side-effect of JPEG compression. The TIFF files I'm working with in Photoshop don't show these artefacts anywhere nearly as bad as this image. But you can most definitely see how this is a huge improvement over a single RAW file.


This image is a crop of the final version showing a similar field of view as the last 2 images. At this stage, The image has been stretched to bring out faint details, colour corrected, and had a false luminosity layer applied to brighten the galaxies and make the fine details stand out. Dust lanes jump out and fine details not visible in the last 2 steps are clearly visible. The true colours of the galaxies and stars are properly balanced as well, giving the final image far more life than you could ever get from a single exposure. As you can see, most of the rough gradients are gone. A small amount of background noise is visible due to the stretching required to enhance the galaxies, but it's really only visible when zoomed in at this level, which is beyond the real resolution that this telescope and camera combination are able to clearly resolve.


And finally, we have the final image at full resolution. It was lightly cropped from its 16 MP size to remove stacking artefacts from the edges, but otherwise, it's the full field of view offered by this scope and camera combination; roughly 2.75° x 1.75°. At this resolution, noise is not a factor and details in the galaxies is smooth. The background is neutral and the star colours pop out. And of course, the galaxies stand out in all their glory with fine detail visible in both.

Full size image here: http://bit.ly/1RPR4uF


The benefits of stacking are numerous, and it's standard practice in modern astrophotography. Hopefully this answers questions on the benefits of stacking and how it affects images. 

Tuesday 22 March 2016

Lunar image stacking. Is it worth it?

To stack, or not to stack? Most astrophotographers will agree it's necessity with deep sky images, but is it really necessary for lunar imaging when the moon is so big and bright in the sky? There are a lot of single frame photos of the moon that show incredible detail, so is it really worthwhile going through the process of taking dozens, or even hundreds or thousands of images and then stacking them? Are the results really that visible? In this article, I we'll go through the process of stacking a lunar image and see the results at each step along the way.


WHAT IS STACKING?

Stacking is a very familiar process to most astrophotographers. Unlike the days of film, there are no longer single 30+ minute exposures of celestial objects taken. These days, several shorter exposure are stacked together to create a final image.

Stacking - whether for deep sky or solar system -  is the process of taking multiple images of the same object and digitally combining the images to increase the signal to noise ratio. With each additional stacked image, more signal is added to the final image while background noise is reduced. Those process of stacking deep sky and solar system images is completely different, but the end goal is the same - to bring out as much fine detail in an image while cancelling out digital noise.

This article will be focusing on lunar stacking. In this case, I won't be covering the fine details of how to use each and every program used in the process, but will talk about the basic workflow that applies to any software you do this with.


THE PROCESS

These are the major steps involved in processing a solar system image. The mechanics of processing the moon, sun, or planets vary slightly in process and equipment, but they all contain these steps. There are different software programs that take care of each step, each requiring its own unique processes, but these are the main steps required.

Acquisition
Pre-processing
Stacking
Sharpening
Post-processing.

Acquisition

It all starts with taking your pictures. Solar system imaging is generally done with a dedicated webcam type camera attached to a telescope instead of a DSLR, and the camera shoots video instead of still frames. Since solar system objects are very bright compared to deep space objects, exposures of more than a few fractions of a second will blow them out completely. These webcams will typically shoot exposures of 30 to 100 frames per second, or 1/30th to 1/100th of a second. Generally, this is also the method used with a DSLR. The camera is set to capture high frame rate / low resolution video like 30-60 fps at 640 x 480 resolution. Planets are so small that they are still tiny in the field of view at that resolution. Planetary imaging is very difficult with a DSLR at prime focus and generally not recommended.

The moon, however, is a much bigger target. Using such a webcam results in very high magnification views of the moon. Craters will be seen in astounding detail, but if you wish to see the entire moon, a DSLR is the only way to go unless you want to take potentially dozens of videos, stack them into images and then create a full panorama of the moon.

For this lunar image, I used a Nikon D5100 attached to an Explore Scientific 80ED apochromatic telescope mounted on a Celestron Advanced VX mount. Tracking isn't necessarily required to shoot the moon. You can also shoot the moon easily with a 300+mm lens on a stationary tripod. Since you won't be tracking, you'll have to manually readjust your framing from time to time to keep the moon in your field of view. You can also shoot the moon with a manually tracked telescope on any type of mount. Once again, you'll need to readjust your framing every so often to keep the moon in frame.

For this project, I shot 470 images of the moon. My camera was set at ISO 100 with exposures of 1/160 of a second. I also shot 10 dark frames (images shot at the same setting but with lens cap on) to reduce noise. I could easily have also shot HD video of the moon at 30 fps with the same exposure settings and used the resulting video to process in the next step. Or for faster acquisition, I could have used my D750 at 60 fps. The end result would have been the same. 

This is the RAW file as it came off the camera converted to JPG without any editing. The moon occupies a rather small space near the centre of the frame. It's quite bright and very detailed. Many people would proudly share such an image online with little to no other post-processing and be quite happy with it. And rightfully so too. It's a great image with sharp focus and good brightness. But with some processing work, we can do much better than this.

NOTE: If you're using a DSLR, make sure to always shoot in RAW mode and never in JPG. And if you're not dealing with video files, use TIFF as your intermediary format and only save out a JPG at the very end for your final image to share online. You want to maintain the highest possible quality through your workflow.

Original, unprocessed RAW image converted straight to JPG.

But zooming in on said image and examining it closer, fine detail shows that there is some visible pixellation and noise. Fine details such as craters are a bit blurry due to atmospheric distortion. And since the moon is so bright due to its advanced waxing gibbous stage, there's very little contrast between light and dark areas.

Heavy zoom showing pixellated detail and noise.

Pre-Processing

The first step to preparing your images is to align your frames, crop them to size, and normalize the brightness. When shooting with a tracker or equatorial mount, alignment isn't as critical. If your polar alignment and tracking are accurate, your target should be in the centre of the field of view throughout the entire series of images. However, if you were shooting full resolution stills instead of a video, you'll see that the moon is but a small object in the centre of your image covering an area of anywhere from 800 x 800 to 1000 x 1000 pixels. Processing full 10+ MP still photos will take a LONG time, so this pre-processing step will save you a lot of time.

Not that even when shooting HD video at 1920 x 1080, you'll still have a lot of black space on either side of your target. Pre-processing will remove this dead space making for much faster alignment and stacking.

For pre-processing, I use PIPP - Planetary Imaging PreProcessor. This free program is available for Windows, Linux and MacOS and I highly recommend it to anyone shooting and stacking images of solar system objects.

I loaded my images and my dark frames in their respective spots under the Source Files tab in PIPP. Since I put in a series of images, it automatically selected Join Mode since these are all pics of a single object. And I also selected the Solar/Lunar Full Disc under the Optimise Options For section. This is pretty self-explanatory.

From the Processing Options tab, I chose to stretch the histogram to 75% and set the black point to 0%. This reduced the overall image brightness a bit and ensured that all my different frames were at the exact same brightness and set my background to black. In this tab, I also chose to crop the image to 1200 x 1200. This left me the moon nicely framed with a bit of space around it.

From the Quality Options tab, I selected Enable Quality Estimation and Reorder Frames in Quality Order check boxes  This will order the images from highest to lowest quality for later stacking.

From the Output Options tab, I chose the output format to be TIFF, which saves a series of TIFF files. AVI output is the default option and is perfect for lower resolution final images or 640 x 480 video, But I find larger video files sometimes don't play nice with other stacking software, so I prefer saving images taken with my DSLR as TIFF. But either way should work.

Then finally, I ran the whole process. And this is the resulting image. This is just a single out of 470 frames that was exported from PIPP. The moon is nicely centred and the brightness neutralized. This will be the series of images that will imported in the next step for stacking.

Original shot - 16 MP RAW file converted to TIFF and cropped to 1200 x 1200
Examining this zoomed-in section, you can see that the noise and pixellation that visible in the previous stage is gone. PIPP performed the dark frame subtraction from each individual image lowering noise levels significantly, It looks far smoother than the previous stage. Detail is still fuzzy and not very sharp, but the pixellation caused by the noise has been removed.

Heavy zoom showing smoothed detail and no noise

Stacking

Next comes the process of stacking the individual frames. There are several free programs for Windows, but I'm not personally aware of any available for Mac. There is a long, more painful way of doing this in Photoshop, but it's very time-consuming and the steps are way beyond the scope of this article.

The 2 leading free programs used are Registax6 (RS6) and AutoStakkert!2 (AS2). RS6 is a favourite of many because it does both the stacking and sharpening stage. It's basically an all-in-one tool for your solar system processeing, whereas AS2 only stacks.  But more on sharpening later. 

When stacking, the software will analyze each frame for quality. Since all my shots were of exceptional quality (all rated 98%+ in PiPP), I told AS2 to stack the top 90%, for a total of 414 frames.

This is the resulting image with everything stacked. Looking at the full image of the moon, you see it's brighter than a single source frame. It's completely smoothed out, is noise-free, and small details that were fuzzy and still pixellated in the last step are showing fine detail that wasn't visible before.

400 stacked frames 

At this stage, the fine detail still looks a little fuzzy, but you can see that there's no noise, and fine detail that wasn't visible in the original pre-processed image is now visible, albeit a little blurred. The image now needs to be sharpened to bring that fine detail into focus.

Zoomed in view of stacked image. 

Sharpening

Sharpening is the act of deconvolution an image to deblur it. There are a couple of ways this can be done. This most common method is through wavelet sharpening using RS6. The other is using a deconvolution filter.

As I mentioned earlier, RS6 is the best free option out there for this process, which makes it a good all-in-one package. You can go right into sharpening after stacking. Or alternately, you can import an image file that was stacked in another program for wavelet sharpening. I won't go into details on the mechanics of using RS6. There are lots of videos on YouTube that can explain how it works far better than I can. But this will be the method that most people will use.

For deconvolution, there are no free options that I'm aware of. I use  Astra Image. which costs $29.95 US. And there are some paid Photoshop plugins that will do this as well. I can't recommend any of them, as I haven't used them personally.

For this image, I opened my stacked image in Astra Image and ran the Deconvolution for Sharpening filter, From this, I chose the Lucy-Richardson Deconvolution and adjusted it accordingly, And this was the result. On this large scale, you can see fine details in the surface that weren't visible at any of the previous stages. Large structures like craters, peaks and valleys are clearly visible. There's far more visible relief on the surface detail than you could see before.

Stacked image deconvoluted in Astra Image

The same area zoomed in shows incredibly fine detail. Small rilles and craters are clearly visible. crater Clavius and its smaller craters pop out distinctly. The ridge on the edge of Tycho is clear and sharp. The image is clear, crisp and noise-free. At this point, all that's left is final cosmetic touch-ups in Photoshop. 


Post-processing

This is where the final touch-ups are made in terms of colour, brightnesses and balance. This last step is where some artistic licence comes in. This can be done in Photoshop, Lightroom, or whatever other software you normally use.

For this, I opened the my file in Photoshop CC and opened up Camera Raw. I made the appropriate adjustments to exposure, contrast, highlights and shadows, to my personal taste just as I would do in Lightroom and applied my DAA watermark. And the final image is now complete.

Final image with some correction in Photoshop.
And as you can see in this same section zoomed in on the final image, the details just jump out. The contrast between light and dark areas is much more distinct. Small craters everywhere stand out. Ejecta lines that were washed out in the source images show up in clear detail. 


THE RESULTS

So I think the original question has been answered. Stacking is definitely worth it on lunar images shot with a DSLR. Regardless how good your camera, equipment or technique is, you can't match the results of a stacked image in a single frame. Sure, you can get some great single images of the moon, but you just can't compete with a well processed, stacked image in terms of fine detail.

Hopefully this will be of help to aspiring astrophotographers who want to take great shots of the moon.

And as always,  clear skies, and keep those eyes and lenses pointed up!

Friday 18 September 2015

Good Advice for for the (Starry) Night Life

Hello again. Welcome back to another instalment of the DAA blog!

I've been quite busy and quite active this summer when it comes to photography. I've been out shooting almost every weekend where the weather cooperates. Anyone who's been following me on Facebook, Flickr, and Twitter will know I've published a lot of pics over the last few months. I'm even beginning to think that now I no longer can call myself a novice at astrophotography. I believe I've stepped into the the "intermediate" category. I'm still learning, but I'm at a stage now where I'm experienced enough to know what I need to do, what not to do, and understand how my different settings on my camera will affect my final product. 

That said, this blog entry is all about lessons learned. Recently I've written two separate "how-to" blog entries dealing with how to shoot the night sky and  improvised dew control methods. But this time, I'm dealing with just generic advice that can apply to anyone and is not directly related to the equipment you're using or the process of taking pics.

As anyone who knows me or follows this blog may already know, I'm a regular at the Lennox and Addington Dark Sky Viewing area and have been since spring 2014. In that time, it's become a quite popular dark sky site in Eastern Ontario and people travel from all over to come and see the darkest skies available in south eastern Ontario. This summer has seen a large increase in attendance at the site, and it's quite a mixed group of people. I've seen quite a few experienced observers and photographers that show up to practice their hobby. And nothing in this blog will be news to them. It's the "other" group of people that this is really geared at - novice and casual observers who make novice mistakes without even knowing it. 

These are the well-meaning, curious people that want to see the night sky. They're not regular public dark site attendees and don't necessarily know the etiquette for using a public dark site nor do they realize what to expect or how to prepare for it. Some people are driving from Toronto or farther just to come and spend a couple of hours under the stars.  They have no cameras, telescopes or binoculars. They just come to take in the sights. There has also been a much higher concentration of photographers wanting to try their hand at Milky Way and sky photography for the first time. And of course, there are novices showing up with their shiny new telescope they haven't a clue how to use. And I've noticed the common errors many of these people make

This blog entry is a set of guidelines when going to a public dark sky site - be it as a casual observer, photographer, or dragging your mini observatory out with you. Many of these may seem like common sense, but over the years, I've come to realize that common sense is nowhere near as common as the name implies. Therefore, these things must be said.
  1. Dress for the conditions: Sure, it may be a blistering 30+ยบC when you leave home for the site. But come 2 AM, the temperature can dip down significantly to the mid teens, particularly in early and late summer. The high humidity that made it feel several degrees warmer than it actually was all day is now going to make it feel several degrees colder at night. That tank top those shorts and sandals aren't going to cut it. Also, make sure you wear comfortable footwear as you may be standing for a considerable amount of time. And ladies, a dark sky site is not a night club. No one cares what you look like. Leave the stiletto heels in the car and wear real shoes. I wish I was kidding on that last point, but I'm not. I've seen it a few times now.

  2. Bring insect repellent: When you go out to a remote site away from the city, you're going to encounter an increase in mosquitoes and other bugs looking to feed on you.  If you head out without any insect repellent, then you're offering yourself up as a meal to literally millions of hungry mosquitoes that WILL show up. Again, I wish I was kidding with that "millions" figure, but I may even be understating it. And of course, like the last point states, dress for the conditions. Wear long pants - preferably made of thicker material like denim so you can't be stung through your clothes. And wear either long sleeves, or bring a jacket. A hat is good too. And in case you didn't know, wearing cologne and perfumes actually attracts insects. If you insist on wearing it, then I encourage your to do so. But please don't stand near me. I want the bugs attracted to you, not me.

  3. Know your gear before bringing it out to a dark site: Nothing is more frustrating than fumbling around in the dark with equipment that you're unfamiliar with. Whether it's cameras, lenses, tripods, telescopes, etc, make sure you've gotten familiar with your equipment before taking it out. Granted, in some cases, you won't be able to use the gear unless you're out in the dark, but take time to play with it, read the manual and get familiar with it in day light before bringing it out to an observing or photo session. I can't begin to recount how many times I've spent a significant amount of time at the DSVA helping out some poor, lost noobie who just picked up a new piece of gear on his way to the site and has no clue how to use it. In some cases, I have no clue either, but just by my past experience, I'm usually able to figure it out. But even when I get something new, even though I know how it works, I try to experiment with it in day light at home first. I'm always happy to help out someone in need, but how much easier this would have been had the person examined their gear in daylight and read the manual before arriving.
  4. Practice light management: I get it. It's dark. You're at an unfamiliar location. You don't want to trip over stuff. So you bring a flashlight. Fair enough. But there's no need to carry an 80 000 lumen LED spotlight you could signal the Voyager probes with. Make sure that it's a DIM flashlight, or ideally a red one. Or use the screen of your smart phone vs the LED light. It takes an average of about 20 minutes for human eyes to adapt to a dark environment. In that 20 minutes, you really won't see much of anything. Once adapted, you'll see surprisingly well, even on a moonless night. But turning on a bright flashlight every few minutes just resets that counter.

  5. If you must use a white flashlight, cover the beam with a piece of clothing or something to dim it. And please, don't flash it in other peoples' faces. Bright light is painful to dark adapted eyes, and you'll end up angering people by ruining their night vision. And if you use your phone or a tablet to use a planetarium app to find your way around the sky, please dim the screen. And many planetarium apps will have a "night mode" that turns the screen red. Please use it.

  6. If you brought it to the site with you, take it with you when you leave: This goes for both personal belongings and waste. Make sure that you have all your belongings with you when you leave. Nothing sucks more than forgetting equipment or personal effects. And nothing sucks more for other people than showing up to a dark site and seeing a bunch of garbage lying around left there by people that were there the night before. Bring your waste with you when you leave.

  7. Give other people their space to work. Don't set your gear up inches away from someone else's. Leave some buffer. Realize that all it takes is a small accidental bump of someone else's tripod to completely ruin their imaging session. A little tap on someone's telescope tripod means they have to stop everything they're doing and go through an entire alignment routine again, get their target back in frame, reset their shooing plan. A slight moment of clumsiness means you've just destroyed the work someone has been doing for potentially a couple of hours. Also, the simple vibration of heavy walking can actually transfer vibration to someone's camera or scope which can shot up as jitters in their exposure. Be courteous and give people their space.

  8. Don't be an "askhole": An "askhole" is defined as a person who repeatedly seeks out the advice of others, monopolizes their time, but then disregard said advice or argues as to why their unsuccessful method is "better". If you seek out people around you who are being successful in their shots when you're not, you should probably heed their advice if you ask for it, particularly if you're struggling and your method isn't working out. That's why you asked in the first place. Most people will be more than happy to help you out. But keep in mind that our time under the stars is short and valuable. We don't mind helping beginners, but we don't like having our time wasted either.
So that's all I've got for the time being. Perhaps I'll revisit this blog in the future and add more to it. If I do, I'll likely reshare it via my Facebook page

So until next time, clear skies, and keep those eyes and lenses pointed up!


Sunday 6 September 2015

Dew Control, Ghetto Style: Keeping Your Optics Dew-Free On A Budget

The Dark Arts Mobile Field Observatory (DAMFO)
photo by Adam Correia
Dew. It's the enemy of anyone outside at night with optics. It will form on your lenses or mirrors and bring an end to your observing or photography session. Any night photography enthusiast who lives in a humid climate has likely encountered this hindrance, and has likely lost a couple of photo session due to it.

As astronomers and astrophotographers, we're all aware of dew control solutions. The cheapest solution for Cassegrain-style scopes and comes in the form of a dew shield. It extends past the corrector plate and helps mitigate dew formation. However, that doesn't help much when pointing straight up. And even when shooting lower to the horizon, a dew shield will at most buy you a bit of time.

The most reliable dew control is using dew heaters. But it's not cheap. Heating strips for most telescopes will set you back at least $100, and you still need to buy the controller, which can range anywhere form cheap 2-channel controllers for $100, to multi-channel for several hundred dollars. All serious astronomers will likely get a real dew control system at some point. But for someone just starting out and in need of a lot of gear, forking out $200 plus buying a heavy-duty battery that can handle the stress of dew heaters is not necessarily feasible. 

When it comes to my scopes, I have the heater setup, so its not an issue. I can last out the most humid of nights where everything else I have outside is soaked, but my optics are totally dry. Since I live in a particularly humid region in southeastern Ontario, it's a must. But when it comes to shooting with just my cameras, that's not really a viable option. But there is hope!

Then there's night photographers using just a camera and lens. Battery operated dew control solutions take time to set up, and not everyone wants to drag around a car or marine battery during a session. Most photographers like their mobility. So an electric dew control solution isn't really an option. 

In my last blog entry, How To Shoot The Milky Way and Night Sky With A DSLR Camera, I touched on dew control and how I go about it. With the use of chemical hand warmer packets, I can keep my lenses dew-free through the most humid of nights. My original setup was 2 hand warmers attached to my lens with a rubber band. This worked great and saved many of of my photo sessions. More recently, I upgraded to a LensMuff by Digital After Dark, a small nylon sleeve with velcro fastener that can hold some hand warmers and snugly attaches to my lens keeping it nice and warm. For more information, you can just click on the link provided to get the detail. And I can't recommend the LensMuff highly enough. It's a cheap, lightweight solution for any photographer that shoots at night. 

However, what I did want to share is how I applied that idea for a dew control solution for my friend Kevin. I've mentioned Kevin in a few of my blog entries, as he's been my "partner in crime" for astrophotography since I started. He was actually the one that got me taking pictures in the first place. My first astro photos were shot using his Nikon D60 attached to my telescope. 

Kevin's Celestron 8SE with my ghetto dew heater
Kevin doesn't have a set up anywhere near as elaborate as mine. He's been slowly piecing his equipment together since last summer. He uses a Celestron 8SE and Nikon D90 along with a bunch of other accessories. Overall, his set up works quite well and has gotten him some decent results. But his big nemesis is definitely dew. 

Last night, he was hesistant about dragging all his gear out due to the high humidity we were dealing with. And rightfully so, as many of his sessions have been ruined by dew. There's nothing more frustrating or disappointing in this hobby than dragging all your equipment out to a remote location to have your gear fog up within the first few minutes after removing your lens cap. But I had an idea to take my "ghetto" dew control to the next level.

Hand warmers attached to a strip of duct tape.
The solution was rather quite simple - 8 hand wamers (probably could have gotten away with using 6) attached to a strip of duct tape. Kevin was rather doubtful at first, but I think he's learned to trust my crazy ideas and was game to go for it. So a quick mental calculation (c=2ฯ€r - high school math ftw) gave me a length of roughly 25 inches to go around the circumference of an 8" mirror. Kevin took out his roll of duct tape (with a space pattern instead of the usual grey!), cut a 28" strip and laid it down, sticky side up. Hand warmer packets were opened, activated with a couple of minutes of energetic shaking, and lined up along the length of the tape. This was then attached to his optical tube as shown in the image below. 

At the end of the 6-hour session, Kevin's corrector plate
was still dew-free!
It was a very humid night. This was the dew collected on
my telescope carrying case.
It was ghetto as hell. It looked ridiculous. But in the end, how your equipment looks in the field really doesn't matter. Function always takes precedent. And if you find a reliable, home-grown solution to a problem, go for it! The picture on the right was taken as we started tearing down our gear at 3 AM. Despite a crazy amount of dew that had collected on everything else that was exposed to the night air, his optics were dry and clear. Note the quantity of dew on the finder scope lens. His corrector plate would be looking like this without my ghetto dew strip!

For an idea of just how much dew we were dealing with, take a look at the picture below. This was the lid of the Pelican Case that I carry my 8" Meade LX90 optical tube in. It was covered in dew, as was the rest of our equipment. The ghetto dew strip worked wonders. It was giving off  more heat than my premium electric dew strip does. Not bad at all!

Now, as ghetto and cheap as this is, over time, this could be costly. I get a large pack of  20 hand warmers (10 x 2-pack) for $13 + tax (about $15) at Canadian Tire. That adds up to about 75 cents per hand warmer. For a camera using 2, that's not too bad at $1.50 per camera. Using this solution for an 8" scope, this came out at a cost of $6. As a 1-time cost, it's not bad. But over time, that adds up pretty quickly. I wouldn't suggest anyone using this as a long-term solution unless you can get hand warmers in bulk at a cheaper price. But for an occasional dew-control solution, this one is a proven winner that was tested under pretty extreme conditions. We couldn't have asked for any better than this.

Of course, this technique can be used on various other scopes too. You can use this to keep finder scopes dew-free as well. You can easily do this to any refractor or Mak-Cass and use even fewer heaters. Want to keep eyepieces dew free? A hand warmer and a rubber band will take care of that too! Over the course of the winter, I may even try to make some kind of case to hold some hand warmers to the back of my scope's hand controller. I don't get out much in winter with my scope, because as soon as the temperature hits -5ยบC, I can no longer read the display on my controller. I can potentially fix that issue and make my gear useable in winter!

So I hope this will help people who need a dew control solution but just haven't quite got the money to fork out for an expensive electric solution. If you have any comments, ideas, or suggestions to improve what I've done, please feel free to leave them in the comments section below or hop on over to my Facebook page @ https://www.facebook.com/darkartsastro and leave your comments there. 

So until next time, clear skies, and keep those eyes and lenses pointed up!

Tuesday 25 August 2015

How To Shoot The Milky Way And Night Sky With A DSLR Camera


The Milky Way over Westport, Ontario

(Blog updated March 2016)

Shooting the night sky for the first time can be a daunting process that can be a challenge even for an experienced photographer doing it for the first time. You're operating under a completely different set of rules than you would shooting more typical targets in either natural or artificial light. So I figured I would put together this brief guide outlining what equipment is needed and the technique to get the best results out of your time under the stars. 

Things you need:

  • DSLR camera with Live View (LV);
  • Wide angle lens with an aperture of f/2.8 or better;
  • Sturdy tripod;
  • Sturdy ball head or pan-tilt head; 
  • Remote shutter control (optional in some cases);
  • Extra batteries; and 
  • Dew control
Camera

DSLRs are great for shooting the night sky, be it for tracked long exposure images or widefield nightscapes. Many people think you need an expensive camera to do this, but really, you don't. As in any case, better quality equipment will yield better results, The camera is definitely a factor, but you can still get great images even with a low end or older DSLR, Ideally, at least a good mid-range camera made in the last 5 years would be your best bet. But that doesn't mean older cameras can't be used.

Whatever camera you choose, I strongly recommend using a camera with a Live View function, LV is standard on pretty much all new DSLRs, but if you're buying used, make sure the camera you're getting is capable of it. LV is indispensable when it comes to finding focus quickly and accurately. You can still use older cameras without a LV function, but focusing will be significantly more difficult. This will be covered later in the focusing section.

My trusty, tried and true cameras are the Nikon D7000 and D5100. I started with the D7000 as it had all the features I could want and was nicely in my $1000 price range at the time I bought it. I used it for most of my earlier astrophotography work - both on a tripod and attached at prime focus on my telescopes, and it's been an excellent performer. I added the D5100 (used for $325) later. While scant on features for general photography, it has the same sensor and processor as the D7000. Since night photography is done using all manual settings, this is essentially the same camera in terms of performance and photo quality. Both are great cameras widely availalbe on the used market for very reasonable prices.

In the fall of 2015, I purchased a full frame Nikon D750. So far, the results I've gotten with that camera have been nothing short of astounding. The wide field of  view, great low light performance, and pro-level features for normal photography make it a pleasure to use. I've had the pleasure of using it for some aurora borealis photography, but I can't wait to use it when the Milky Way will be at its prime this summer. 
Vivitar 13mm f/2.8 lens

The Lens

As a general rule, the wider angle your lens, the nicer your nightscape will be. Ideally, a prime focus lens of 50mm or less (on full frame ) or 35mm or less (on crop sensor) with a maximum aperture of f/2.8 or better are preferred. You can still get good shots with a zoom lens, but use it at a short focal length as noted above (less than 50 / 35mm) and maximum aperture for best results.

Prime lenses (no zoom) are the ideal lenses to use. They result in much sharper images than any zoom lens.


If you've got deep enough pockets, a lens that uses Extra-low Dispersion (ED) glass will be your best choice, as the resulting images will be sharper and free of any chromatic aberration. My favourite 13mm Vivitar prime lens uses ED glass, and the results I've gotten with it are absolutely stunning. It's one of my least expensive lenses at around $400 and it's the one that I've captured all of my best widefield images with, particularly when paired with my D750.

Tripod

A tripod is necessary for night shoots. You can't do long long exposure images with a handheld camera. A sturdy tripod is highly recommended. A light, rickety tripod takes a few seconds to stabilize after you touch it and is easily shaken by wind. It can even transmit vibrations from people walking by. Get a sturdy tripod. They're not cheap, but they're an often overlooked part of a novice's equipment.

Manfrotto 190XPROB
My personal view on this is I don't see the sense of putting a camera and lens that costs potentially thousands of dollars on a cheap, rickety tripod that can barely support the load. One little accidental bump or kick could potentially snap off a leg and send your expensive equipment crashing to the ground. And for the best results, you need a platform tthat's as stable and vibration free as possible. And you just can't get that with a cheap, flimsy tripod.

That said, you don't need to fork over $700 for an ultra-heavy-duty carbon fibre model. But get something that's strong enough to support the weight of your equipment, won't go crashing to the ground with a little bump, and won't sway in a light breeze. It will save you a lot of frustration and potential expense in the long term.

My personal favourites are the Manfrotto Pro series. I have both the heavy duty 055XPROB and its slightly lighter sibling, the 190XPROB. They offer incredible stability and extreme flexibility in adjustment for everything from astrophotography to macro photography. Both are solid, stable and durable and will last you a lifetime. 

Tripod head

Manfrotto 496RC2 ball head
The tripod head you use is also important. Whether it's a ball head or some other head, make sure that it's steady, operates smoothly and once you lock it down, there's absolutely no play in it. The quality of your final image depends greatly on the stability of everything your camera is attached to.

I own two Manfrotto 496RC2 ball heads and a Manfrotto MHXPRO-3W 3-way pan/tilt head. All 3 heads use the same adapter plate, so I can swap tripods, cameras and heads without having to change adapter plates on my cameras.

Just ensure that whatever head you get, it's designed to handle the weight of your camera with the heaviest lens you own. It's always better to have an over-spec head than one that's too lightweight for the gear you plan on mounting on it. 

Remote shutter release

The remote shutter control is not essential, but a very useful tool to have and I would highly recommend always using one. Handling your camera causes it to vibrate. Even on a rock-solid, heavy duty tripod with a solid head, the act of pressing the shutter release will cause a bit of movement in your camera which will take a bit of time to stabilize after. Using a remote of some sort will prevent this, giving you a sharper final image. 

Most DSLR cameras have a shutter delay function. If you set a shutter delay of 2 seconds, you can press the button on the camera, and everything will have a chance to stabilize before the shutter activates. But if you don't have shutter delay, you will need a way of remotely triggering your camera. 

Nikon MC-36A Multi-Function Remote
One very handy and versatile type of remote shutter release you can get is an intervalometer as is pictured on the right. This a requirement if you intend to do any sort of time lapse, meteor, or aurora photography. They're available in both wired and wireless flavours and will have a locking shutter button that you can manually lock down when the camera is in BULB mode. These units can be found on eBay or Amazon very cheaply. 

My recommendation is to avoid the brand names, as they tend to be rather expensive with no real advantage. I own a "JYC"-branded knockoff of the Nikon MC-36 remote. It's identical in size, weight, function and look to the original and works flawlessly. I've had it for over 2 years now, use it all the time, and just a couple of weeks ago I finally replaced the original batteries it shipped with.

The cost of the Nikon unit? The cheapest I could find it for new was $180 CDN + tax at a local shop. The cost of the eBay knockoff? $25 CDN shipped from China. You do the math and decide if having a little Nikon or Canon logo on your intervalometer is worth the extra $150 to you.

Batteries

You wouldn't think this needs to be said, but it does. This is simple enough. Buy extra batteries for your camera and make sure they're charged. Nothing ends a photo session early on such a sour note as finding out you drove an hour or more to a dark site only to have your only battery die on you within minutes of arrival. The number of times I've seen this happen to people is borders on the ridiculous.

Another good idea is adding a battery grip to your camera to house a second battery. This can significantly extent a photo session before you need to replace batteries. But keep in mind that brand name battery grips aren't cheap. Depending on your camera, they can cost anywhere from $200-400. Knockoff brands can range from $40-80 on eBay or Amazon, and will sometimes come with extra batteries. While this seems like an attractive proposition, most are made of cheap, flimsy plastic. Since you'll be attaching your tripod plate to the bottom of this grip to attach it to your tripod's head, you're potentially instability into your setup, as the plastic will flex when you touch the camera or in a breeze, causing sway.

I can attest to this point from personal experience. I have a knockoff  plastic battery grip for my D750.  While excellent for handheld use, it's useless for night photography When mated with the Nikkor 24-70 f/2.8G or Vivitar 13mm (both very heavy lenses), it's too unstable to use on a tripod. However, I have a Nikon-branded  grip for my D7000. It's made of the same magnesium alloy as the camera's body. Despite the D7000 being a heavier camera body, it's rock solid on a tripod with the same heavy lenses.

Dew control

If you're in a humid climate, inevitably you'll find that your lenses will start to fog up with dew -  another problem that ends many photo sessions short.. You might start wiping the dew off with your lens cloth, but you'll find this will only buy you a couple of minutes are best.

Hand warmers keeping my lens dew-free
But it doesn't have to be that way. There's a cheap and simple solution exists for this problem - hand warmers. That's right. Those little packets of chemical hand warmers that you can put in your mittens in winter to keep your fingers warm are your lens' best friend out on a humid night. They can be bought in large packets at most sporting good stores and other locations. Take them out of their packaging, activate them by shaking them, and then attach them to the top and bottom of your lens using a wide rubber band. And be sure to attach them to your lens at the beginning of your session. You want to proactively prevent dew from forming by keeping the lens a couple of degrees above the dew point. Adding them after the dew has already formed is far less effective, because your entire lens, its elements and internals will have cooled, and it will take a long time for the hand warmers to bring the temperature back up to above the dew point.

Sure, this solution looks silly as hell and some people will laugh at you for it. It's happened to me. But I'm the one who's left laughing when they're packing up early due to dew while my lens is clear despite the fact it's been pointing straight up all evening.

The Digital After Dark LensMuff
An even more elegant dew control solution is a great little item called the LensMuff from Kevin Adams Photography / Digital After Dark. It's a small nylon sleeve with a velcro strap that can hold 3 hand warmers. It neatly wraps around your lens and traps the heat of the hand warmers, making it even more effective than just holding the hand warmers in place with a rubber band. I've been using these for some time now, and I love them. I've even used one on the finder scope on my telescope to keep it dew free. If you're serious about night photography, this is an amazing product that you really should consider.

The process

So now you have all the equipment you need. You need to find yourself a dark site away from city lights. The farther, the better. While the sky may appear dark a short distance outside of an urban area, long exposure photography will bring out sky glow you may won't notice with the naked eye.

Depending on where you live, the best parts of the Milky Way will be visible at different times of year. In the northern hemisphere, the Milky Way is visible before midnight between May and September, with best time of the year for visibility being July when the core is the highest above the horizon. At lower latitudes, more of the core (the good part) will be visible.

You also want to make sure you're shooting on a moonless night, as moonlight washes out the details of the Milky Way like city light pollution does. The New Moon is the best time to shoot since you'll have no moon to contend with. For a week or so after the New Moon, the moon will set reasonably early, so you're still good to get some shots after it sets. The week before the New Moon, the moon will rise late in the night (40 minutes later each day), so you're good for some shooting before it rises. So in brief, you have about a 10 day window each lunar cycle where the conditions will be great for photographing the Milky Way. 

Camera settings
  • Manual mode
  • Aperture wide open
  • ISO setting
  • Disable noise reduction
  • White balance adjustment
  • Exposure time
  • Focus
First and foremost, you need to have your camera set to FULL MANUAL mode, or M on your mode selector dial. There's no automatic setting for the sky. I've seen many people struggle with the "nightscape" settings on their cameras, and nothing good ever comes from it! If you have any type of automatic setting on your camera, turn it off.

One very important point that needs to be stated: SHOOT IN RAW MODE. Never shoot the night sky in JPG, as compression will prevent you from being able to properly post-process the image. The files might be larger, but that extra size means extra quality. Set your image to RAW-F, or the finest quality and highest resolution your camera is capable of. 

Your aperture needs to be wide open for the lens you're using to allow in as much light as possible. Depth of field is irrelevant for night photos. You focus on the stars, even if there's landscape in the foreground. As I stated, the best results will come from a lens that opens to at least f/2.8. The wider the better. My 35mm f/1.8 lens is absolutely amazing for getting fine detail and contrast in the Milky Way. I've seen a 35mm f/1.4 lens used, and it basically blew me away with how much difference there was. As with telescopes, when it comes to shooting the sky, aperture is king. Bigger and faster is better for collecting as many photons as possible.

Your ISO settings will depend on your camera. Your ISO is your sensor's gain, or amplification. The higher the number, the more your signal is amplified. The down side of this is it also amplifies noise generated in your sensor. Modern full frame sensors can easily handle ISO settings up to 3200 or higher. Lower end cameras may only be able to handle 2000 or 1600 before adding too much noise. This is a setting you'll have to experiment with. I would recommend starting at ISO 2000, taking a shot, and adjusting up or down depending on the noise present in your image until you find a sweet spot you can live with.

One of my scopes imaging with the Milky Way in the background.
Flickr link: https://www.flickr.com/photos/crunchmeister/20410658386/in/dateposted-public/

Most DSLRs will also have 1 or 2 different noise reduction (NR) routines built in. One is known as Long Exposure NR, the other is High ISO NR. Both sound really good when shooting the night sky, but have their drawbacks.

Long Exposure NR is actually a very usable one. When you take an image, the camera will automatically take a second image at the exact same exposure length and ISO, but with your shutter closed. This is known as a dark frame. This is basically an image of the noise generated by your sensor. The dark frame is then digitally subtracted from your original image, called the light frame. This leaves you with a much cleaner final image. While this sounds good, you now take double the amount of time to shoot 1 picture.

The down side of Long Exposue NR is that if you're trying to shoot star trails or time lapse, this double time will leave gaps in your trails and give you far fewer frames for your time lapse. Most people find it preferable to either do manual dark frame subtraction, or use no dark frames at all. After a while, you'll become familiar your camera's performance and any noise will be easily managed with luminance noise reduction in Lightroom or Camera Raw.

If you want to push your camera and want to do manual dark frame subtraction, the proces is quite simple. Take a bunch of pictures of the sky normally. Before you finish, cap off your lens and snap off a dark frame. In your post processing in Photoshop, you can take this dark frame, layer it on top of your light frame (before making any adjustments to it) in a separate layer, and switch your blending more to "subtract". This dark frame subtraction will clean up your images of your sensor noise. Just keep in mind that dark frames are temperature-dependent. You have to shoot it at the same temperature as your light frame. If you were out on a cold night, forgot to shoot your dark, and then trying to shoot it inside your warm house the next day, it won't work.

High ISO NR is another one that seems to make sense at first thought. You're using high ISO that introduces noise, so why not let the camera automatically remove it? For regular low light photography, this actually works quite well. For night sky photography, the camera can't tell the difference between faint stars and noise and the camera will detect faint stars in your image as noise and remove them. When shooting the Milky Way, faint stars are what give it its cloudy appearance. Using High ISO NR will basically kill your image. Don't use it!

White balance is another one of these settings that you need to experiment with. Just don't use auto white balance. There are different schools of thought on white balance. Some people like to use sunlight / daylight settings, which I find work well. Others choose the tungsten light setting, which also gives good results. Personally, I like to set the colour temperature directly. I find that in post processing, I tend to tweak my temperature somewhere in the range of 3500-3750ยบ K. This tends to give me the best colour balance for the Milky Way. I find this tends to vary on different cameras. I'd say the best is to experiment and find what gives you the colours you like best. In any case, you'll be shooting in RAW mode (never JPG), so you'll be able to make your white balance adjustments in post processing, so this isn't a crucial setting in the field.

Finally, the big setting is your exposure time. This is the one that gives photographers the most difficulty. Because the Earth rotates, it gives the appearance that the sky is moving. If an exposure is too long, stars in your image will change from points to hyphens. You want to be able to expose your image for as long as possible without introducing this star trailing. Your exposure length will vary on the lens you're using. The shorter your focal length, the longer you'll be able to expose without visible trailing. You may have heard of the Rule of 600 or Rule of 500. Personally, I use the latter, as it has tighter tolerances.

The Rule of 500 goes as such:
xT  = 500 / (f x C)

Where:

xT = exposure time (in seconds)
f  = focal length of your lens (in mm)
C  = crop factor of your sensor (use 1 for full frame, 1.6 for Canon, 1.5 for Nikon and Fuji crop sensors)
So in my case, I ,mostly use my Vivitar 13mm lens on my D7000 with a crop sensor. For that lens, my exposure time is:
xT = 500 / (13 x 1.5)
xT = 25.6 seconds.
I also like using my 35mm f/1.8 lens for it's larger aperture when I do panoramas of the Milky Way, so:
xT = 500 / (35 x 1.5)
xT =  9.5 seconds
For comparison, my 13mm lens when used on my full frame D750
xT = 500 / (13 x 1)
xT = 38.4 seconds.
As you can see, the difference between exposure times for different lenses varies greatly, and you'll get far longer exposure times on a full frame camera over a crop sensor.

Reflections From Eternity
Flickr link: https://www.flickr.com/photos/crunchmeister/18445879194/in/dateposted-public/
Getting ready to shoot


So now, you're ready to shoot! But there's 1 last, key process to take care of. And for many first time night photographers, this can be by far the most daunting - FOCUS! It will require some tweaking, but with practice, following these steps will make the process a lot easier. 

Focus in 7 easy steps:
  1. Turn off auto focus (very important)
  2. Find the brightest star you can see in the sky. In the summer from the northern hemisphere, that will be Arcturus, which you can easily find be found by tracing a line outwards from the handle of the Big Dipper. It's a big orange star. You can't miss it.
  3. Using your camera's viewfinder (not LV), find the star and centre it in your field of view. Get rough focus that way;
  4. Enable your LV. The star should be visible.
  5. Using your LV's digital zoom, zoom in to full power on the star;
  6. Now using your focus ring, adjust your focus until the star is as small a pinpoint as possible.
  7. Once you achieve focus, DON'T TOUCH YOUR FOCUS RING AGAIN UNLESS YOU CHANGE LENSES. A small piece of tape can be use to secure the focus ring and ensure that you don't accidentally knock it out of focus handling the camera.
Now that we've covered focusing, it's worthwhile expanding on a couple of those points. At Step 6, you'll be adjusting your focus. This can be a bit difficult, as touching your focus ring will cause your camera to move and shake, making focus difficult. This is where having a sturdy tripod with a solid head will make a huge difference. The more stable your support, the less shake you'll get while adjusting focus, making focusing easier and far more precise.

Step 7 is one I could have left out, but I added on for the photographers that can't leave their focus rings alone. I've noticed a lot of experienced daylight photographers are so used to holding onto their focus rings and constantly adjusting them. And that's fine for doing daylight or studio photography. but for astrophotography, it's a big no-no and a habit that needs to be broken. Once you have focus on 1 star, you're now in focus for anything else in the sky and further adjustments are not required.

At this point, you're set to shoot and it's all about your creativity. Composition, adding landscape, and compositing images are beyond the scope of this article. But now you have all the information you need to capture great images of the night sky using your DSLR.

So until next time, clear skies, and keep those eyes and lenses pointed up!